Showing posts with label MS PowerPoint 2010. Show all posts

Saturday, 7 December 2013

Grid Lines and Guides in MS PowerPoint

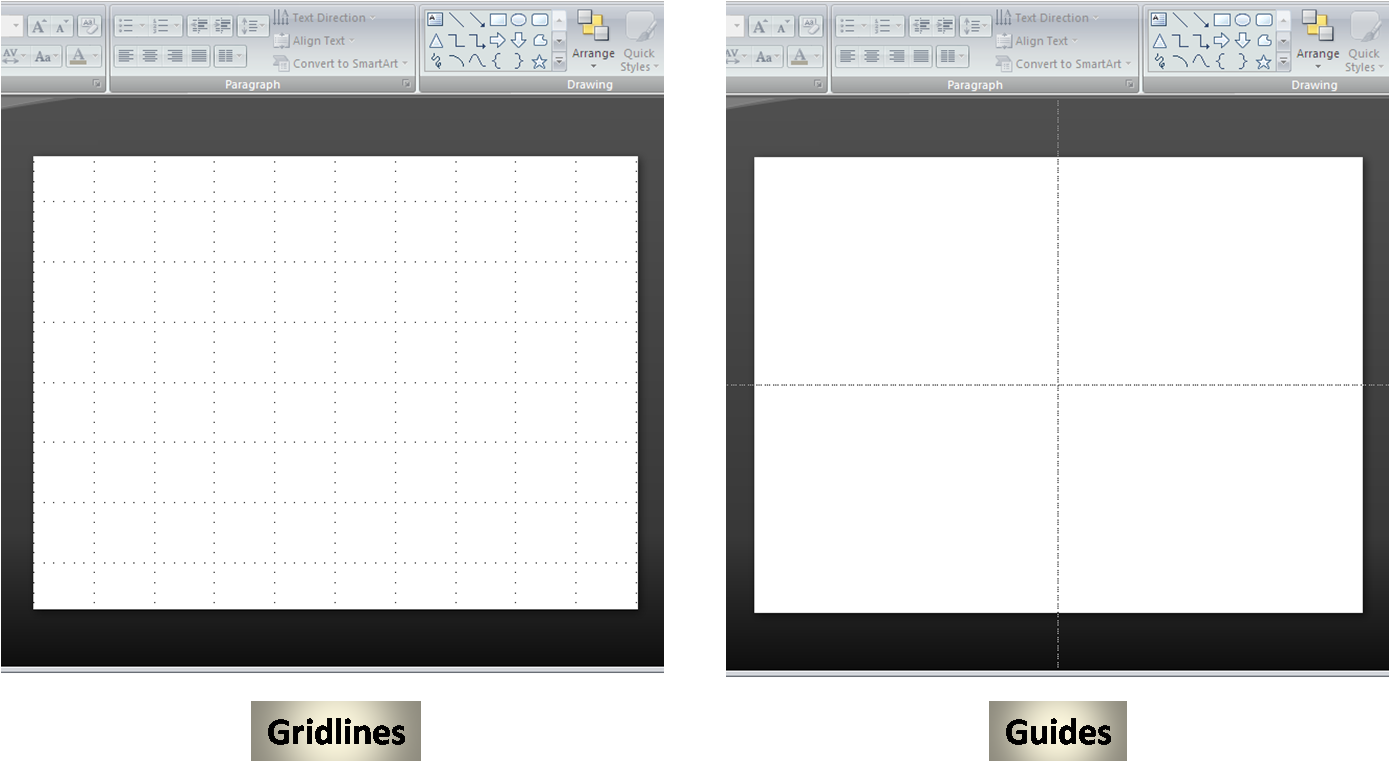
Gridlines and Guides is an important feature in PowerPoint which is often neglected. This is because it doesn't have a direct use in presentation making. Instead it aids in making presentations cleaner and more precise. Before moving forward, it is imperative to understand the difference between the two. 


Gridlines helps you in 

a) Ascertaining center of slide
b) Precise positioning shapes and objects 


By default, gridlines are spaced 0.083 inches apart. Guides, on the other hand, basically help you in drawing shapes and then precisely positioning it. They also help in adjusting the relative positions of the objects. Another important distinction between the gridlines and guides is that the gridlines are fixed positions (depending on your settings) while guides are movable lines. You can also create multiple guides by using Ctrl key with mouse/keypad (just like you replicate objects). 

Both gridlines and guides aren't visible during presentations.

Use of Gridlines 

In the picture to the left is an arrangement of the different objects. The same objects are shown individually in the right hand side. You can clearly see how neatly the objects have been positioned with respect to one another. This precise positioning can be attained through the gridlines. 


The picture below shows how the gridlines guide you in placing the object on the slide in the precise manner easily. 


Use of Guides

In the following example the aim is to draw a boomerang. The shape of boomerang requires symmetry on both sides. This can be achieved through the use of drawling guides. 


In the picture to the left you can see how the guides have helped in drawing the boomerang swiftly and easily. To the left is the finished boomerang. 


Friday, 6 December 2013

Shape Combine feature in MS PowerPoint 2010

Sometimes the emphasis in any presentation is more on the visual side rather than text side. The presenter makes use of arrows, lines, square & rectangle shaped boxes as well as many other shapes to drive his point home in simple yet powerful way.

In this article we will be focusing on the feature of Combine Shapes which was introduced in 2010 version. It is a very powerful feature which allows us to make many complex customized shapes using different combinations of individual shapes. For the sake of understanding the basics, we will be making use of 2 rectangles to show how it works.

So we have 2 rectangles as shown below and we wish to combine them to create a shape as per our need. 


Since we are not trying to make any specific shape, let’s just rotate one of the rectangles and place it on the other. 


Now select both of them and click on combine shapes in Quick Access Toolbar. 4 different options are shown to us – shape union, shape combine, shape intersect and shape subtract.


When we go for shape union, we get to see the following result


Shape combine will yield a shape as follows


Following is the result of Shape intersect


Lastly, shape subtract will leave us with the shape given below


With the proper understanding of the 4 ways of combining and some imagination, one can create wonderful customized shapes to suit one’s presentation requirements. Of course, you need to practice a lot to achieve the desired results. But proficiency here can really do wonders for your presentation. 

Wednesday, 4 December 2013

Freehand Shapes in MS PowerPoint

One big reason behind the enduring popularity of MS PowerPoint is that it allows a lot of customization on the part of the user. This customization gives the users a lot of flexibility and creative space which helps them in adding value to their presentations. 

Since MS PowerPoint 2007, the users have got a great pool of shapes at their disposal which can be used for various purposes. The most striking feature though is the ability to make freehand shapes. It provides an additional flexibility to the users.

Freehand shape, as its name implies, is a feature through which you can make desirable changes in a particular shape so as to create a new one. Even with limited creativity you can gain expertise in it through a lot of practice. Here we will be using a small example to show how it works.

1. Go to Insert a shape and choose any shape from the options given. 


2. We chose a shape like the following 
3. Now first convert the shape into freeform so that you can introduce changes in it. 


4. Next click on the Edit Points. Now you are ready to modify the shape as per your wish. 


5. You can see various points on the edges of shape. These points can be dragged in different directions, along various curves to give a desired change to the shape. For instance, the two points in the left upper corner are dragged towards the mid point in this freeform shape as shown below

6. This is what you get upon performing the above action. 


7. Now if you similarly drag the points present in other three corners, you'll end up with a shape like following. 


This was just a small example. The freehand shapes utility can actually do wonders. All you need is imagination and a thorough practice. 

Tuesday, 3 December 2013

Grouping Utility in MS PowerPoint

When we work with objects like shapes and pictures in a presentation, sometimes there is a need to combine them. The purpose might be moving them to some other slide or creating a new object using the existing ones. The grouping utility of MS PowerPoint helps us in performing this function. Let’s see how it is done. 

There is a small world map in a slide, as shown above. Now we wish to increase the size of the map in a way that neither the dimensions of the countries nor their positioning with respect to each other change. This is a tough task considering that the world map itself is composed of individual maps of the countries as shown below. 
      
     So we have an assortment of many small objects here. The best way to move forward will be combining them and form a single object. This way we will be able to move all the objects in a single go.  The first thing to do is to select all the objects and then press CTRL + G. 
      
     This command groups all the selected objects. The another way of doing it is right clicking and choosing Group option as show below


     We can now increase the size of the map using Shift + mouse/keypad. The resultant image is as follows - 


     The objects can be ungrouped in the similar way once you have moved the combined object. Just right click and select Ungroup.
     
     There is an interesting thing about this feature. One might need to perform the same grouping and ungrouping action a number of times during preparing a presentation. Keeping that in mind, MS PowerPoint saves the grouping and ungrouping exercise. So you can repeat the action by right clicking any object that was the part of the grouping and selecting Regroup as show below.


Saturday, 30 November 2013

Shortcuts to be used during Presentation mode

Shortcut Keys
Description
F5
For beginning the slideshow
Shift+F5
Starts slideshow from the slide you are on i.e. the current slide
Slide Number + Enter
Takes you to the specific slide you wanted to go to
S
Stop/Restart the presentation through this key
Ctrl + P/E
Displays pen cursor/Erase drawing for the purpose of highlighting
B
Changes the background into Black colour
W
Changes the background into White colour
E
Erases all the highlighting done in the slide

Apart from the general shortcuts which come handy in all three Microsoft Office applications, and the ones we discussed in our previous articles, there are few specific ones which can be used during delivering presentations. These shortcuts allow for swift navigation and editing even during a running presentation. 

1. F5 - Hitting this key will start the slideshow. It doesn't matter if you are on first, last or any other slide in between. Just press F5 and the presentation would begin from the very first slide. 


2. Shift + F5 - This shortcut will start the slideshow from the slide you are on.This allows you to introduce any change in the current slide and then resume the presentation from that same slide. 

3. Slide Number & Enter - It allows you to go to any specific slide in between a running presentation. Please note that the slide number and Enter keys are not be used concurrently but subsequently. First input the number and then hit enter. All you need to do is remember the slide number you want to jump to. 

4. S - This key is used to stop or restart a presentation in an 'Automatic' mode. This key won't work in manual mode. 

5. Ctrl + P/E - A pen cursor is a handy tool used for highlighting specific points in a running presentation. It can be introduced by pressing Ctrl and P. The highlighted part can be brought to the original form by erasing all the changes done by the pen cursor. The eraser is introduced through Ctrl and E. 


6. B/W - The background of a particular slide can be converted into black or white colour as per the need by pressing these keys during a presentation. 

7. E - You can easily remove all the highlighting that you have done in the current slide by simply pressing E.

Note - CTRL + E and E, both are used for erasing purpose with a slight difference. The former is used for selective erasing of the highlighted portions, while the use of latter is in complete erasing. 

Wednesday, 27 November 2013

How to view and edit a presentation simultaneously in MS PowerPoint

One action that many of us do frequently on MS PowerPoint is going for slideshow to check how the slides look after some editing/modifications. This consumes time and is equally irritating. But you will be delighted to know that MS PowerPoint has a wonderful feature in place which allows us to view and edit a slide simultaneously. This is how it is to be used.

1.      Open the presentation and select the slide you want to edit
2.      Press CTRL tab and click on the slideshow button. Don’t release the tab while doing this.
3.     A medium sized window will open in the top left corner displaying  the particular slide.


4.   Any modification in the original slide will be displayed in the window as well. You can switch between the two easily through ALT + Tab keys.

There are a couple of points worth noting here

a) Don’t use the combination of CTRL + F5. It will just change the window size of the presentation. Click on the slideshow button instead after pressing CTRL.

b) Due to the small size of the view window, one can only have an overall view of the slide. Any text editing will be hardly visible unless the font size is large.

Tuesday, 26 November 2013

Shortcuts for editing object in MS PowerPoint (Changing dimension, positioning and orientation)


Shortcut Keys
Description
Shift + Arrow keys
Changes the dimensions of the object
Shift + Mouse/Keypad
Changes the dimensions of an object without distorting it.
Ctrl + Arrow keys
Used for nudging of the object in the same row or same column
Ctrl + Mouse/keypad
Allows replication of the selected object
Ctrl + Alt + Left / Right
Allows rotating the object to the desired degree
Enter
Adds a new slide

An object in PowerPoint may refer to a text box, a picture, a table, a shape or any such thing. Mostly our slides are composed of a lot of objects and so there is a constant need of editing them in terms of their dimensions, orientation or positioning. The above mentioned shortcuts help us do that efficiently. 

1. Shift + Arrow keys - You can change the dimensions of the object easily through it without even using your mouse/keyboard. 

2. Shift + Mouse/Keypad - The use of this shortcut ensures that the change in the dimensions of the object is uniform in all respects. 

Let's see how Shift + Mouse/keypad is a better tool to change the dimensions of an object as compared to dragging using mouse or keypad alone. We have an object (a picture) whose dimensions we want to change. But we need to ensure that it is not distorted in this process. 


Now, when we drag the picture using mouse or keypad, we might end up with any of the figures given below if we don't pay complete attention to the direction in which we are dragging. 

But you needn't worry about the distortion at all when you go for shift key with dragging as the former don't allow change in the direction. We get the following result upon using shift with mouse or keyboard.  


3. Ctrl + Arrow keys - Sometimes there is a need to bring a very minor change in the position of the object. This shortcut accomplishes that task as it allows you to 'nudge' the object horizontally or vertically. 

4. Ctrl + Mouse/keypad - Control key with mouse/keypad is used for the replication of an object. An example will make it more clear to you. 

There is an object that you want to replicate. Just select the object and put the cursor over it. Now when you press the CTRL key, you will notice a small + at the right side of the arrow of the cursor. It is an indication that now the object can be replicated. All you need to do now is to drag the object with CTRL key firmly pressed. You will see another object emerging from the source object, as show below. 

5. Ctrl + Alt + Left / Right - This shortcut allows you to rotate the object to a desired degree. For example, just look at the screenshot given below. 
6. Enter - This isn't exactly a shortcut for editing object, but has a handy utility nonetheless. To add a new slide, just select the slide following which you need the new one and Enter. 

Saturday, 23 November 2013

Shortcuts for editing content in the text box in MS PowerPoint

Shortcut Keys
Description
F2
Selects the whole text within a selected text box
Alt + Shift + up/down arrow
Selected bullet point or paragraph can be moved up or down
Shift + Left/Right Key
Selects the text character by character towards left or right
Ctrl + Shift + Left/Right Key
Selects the text word by word towards left or right i.e. JUMPING WORDS
Ctrl + Shift + >/<
Increases/decreases the font size of the selected text
Shift + F3
Changes the case of the selected text from lowercase to titlecase to uppercase and vice-versa when keys pressed in succession.
Unlike MS Word, you can’t write anywhere on a PowerPoint slide just by double - clicking and typing. You can only write inside a text box and to add content on a specific point of a slide you first need to insert a text box there. There can be several text boxes on a single slide. To edit the content inside a text box quickly, you need to have a good knowledge of various shortcuts. Here we have highlighted the six most important ones.

1. F2 - It is the quickest way of selecting the whole text within a text box. Kindly note that if you have clicked inside the text box for editing, then you will need to press F2 twice to perform the same action. 

2. Alt + Shift + up/down arrow - This shortcut is very useful for quickly moving the lines/paragraphs within a text box. 

The following example shows the application of the shortcut used for moving lines/paragraph up or down.


3. Shift + Left/Right Key - This shortcut is helpful in selective editing. So if there are just few letters you want to edit then go for this shortcut. 

4. Ctrl + Shift + Left/Right Key - It allows greater flexibility as you can edit the whole words using this shortcut. 

5. Ctrl + Shift + >/< - This is the quickest way of changing the font size of the selected text. The size increases/decreases by 2 everytime you use the shortcut. 

6. Shift + F3 - The easiest way of changing the case of the text is to use this shortcut. The folliwng example shows how it is used.